
Why Two Tone Kitchen Cabinets Work
Two tone kitchen cabinets are more than a trend. They are a design strategy that balances beauty and function. By using two colors or finishes across uppers, lowers, and the island, you can shape how the eye travels, make a small room feel taller, or anchor a large space so it feels grounded. When done well, two tone cabinets look timeless and intentional. When the dark and light split is off, you may feel stuck with something that fights your lighting, flooring, or layout. This guide makes two tone kitchen cabinets simple. Discover the smartest dark and light split for uppers, lowers, and islands. Avoid regrets. See examples and pro tips now.
At Redleaf Renovations, we help homeowners choose colors with confidence, then build the cabinetry to match the plan. Our team uses high-quality materials and Amish-built cabinetry so your finish looks refined on day one and durable for years to come. Whether you are updating a Wauwatosa bungalow or expanding a suburban kitchen, we tailor every choice to your home and your daily life.
Start With the Split: Uppers vs. Lowers
The classic rule that fits most kitchens
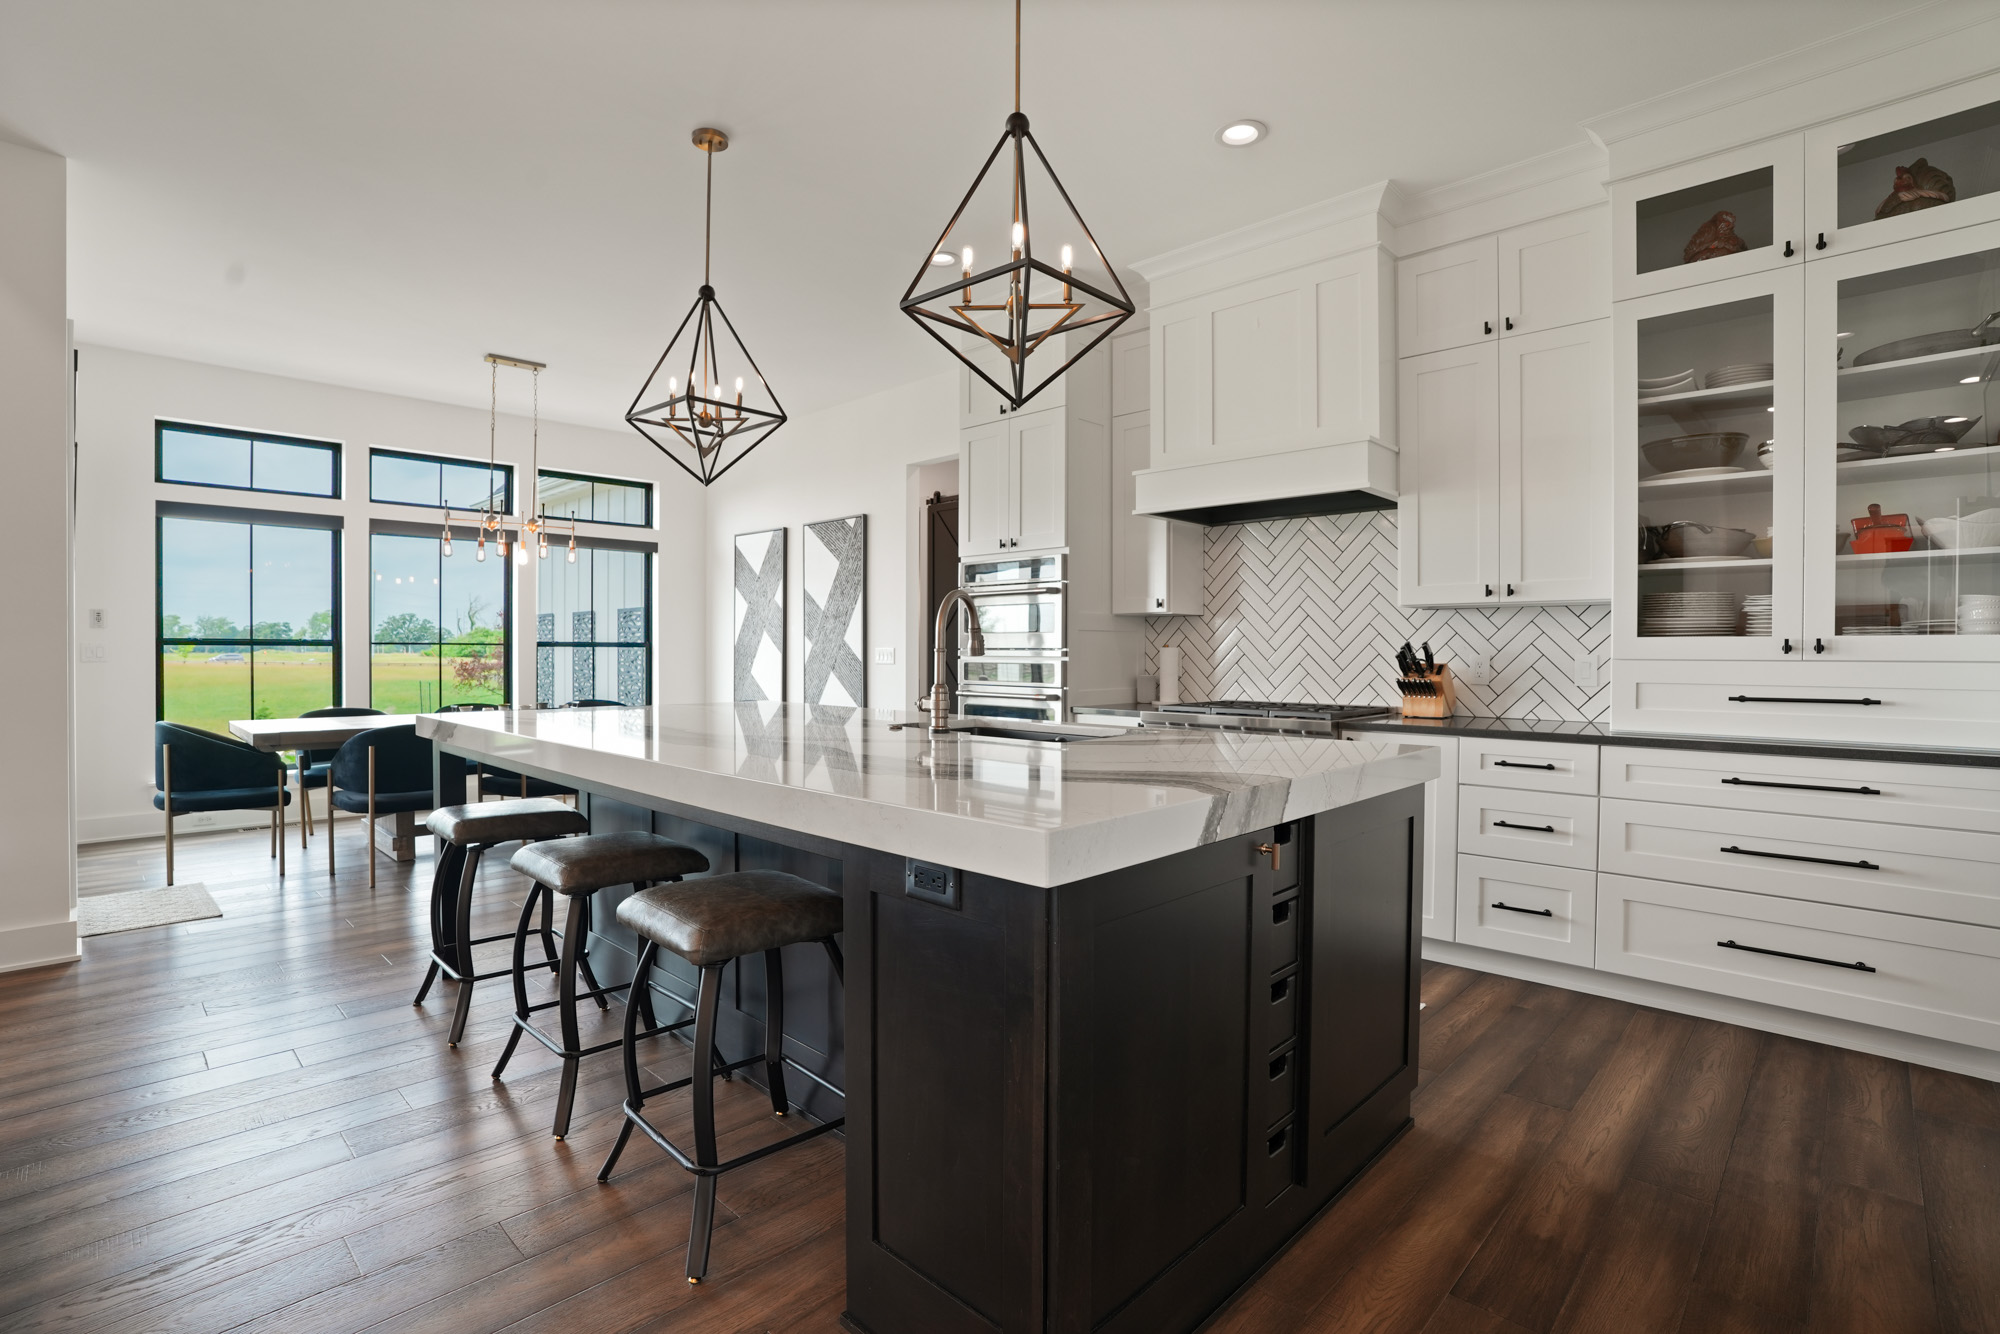
The most reliable approach is light uppers and darker lowers. This puts visual weight near the floor and keeps the space feeling open above the countertop. Light uppers bounce more light across the room, reduce shadows, and make ceilings feel higher. Darker bases hide scuffs and family traffic. For many clients at Redleaf Renovations, this split delivers the best mix of beauty and practicality.
- Choose this when your kitchen is small or has average ceiling height.
- Use it when you want a calm, airy feel without sacrificing contrast.
- Lean on it if your floors are medium to dark, because the darker lowers will bridge the floor to the counters.
When to flip the script
There are cases when darker uppers and lighter lowers make sense, but use this with care. Consider it if you have extra tall ceilings and want to visually lower the room. It can also work if your backsplash is very light and you want rich color near the hood for drama. Designers sometimes do a darker upper accent on a single feature wall while keeping the rest of the uppers light. This creates a focal point without closing in the whole kitchen.
If your kitchen has limited natural light or a low ceiling, avoid dark uppers. Most homeowners regret the heavy feeling they bring. In those cases, keep the upper cabinetry light and add depth with a darker island or base cabinets instead.
How to align the split cleanly
The success of two tone kitchen cabinets often comes down to clean lines. Align the change in color at natural breaks. The countertop is the most reliable divide between light and dark. If you have a tall cabinet run next to standard uppers, consider carrying the base cabinet color up the tall units for consistency. On a wall with open shelves, choose whether the shelf finish matches the uppers or acts as the accent, but keep it consistent across that wall.
Watch for window sills and range hoods. A white hood floating over darker uppers will look disconnected. Instead, either match the hood to the uppers or let it echo the lower color and continue that color up the flanking wall cabinets for a framed effect. Redleaf Renovations often models these scenarios in 3D so you can see how the lines stack before anything is built.
Where the Island Fits Into Two Tone
The island is your best place for a bold accent. In a standard perimeter of light uppers and darker lowers, choose the island as the darkest tone or a complementary stain. This creates a clear focal point without making the room feel busy. A wood island paired with painted perimeter cabinets adds warmth and texture. If you have veined stone, pulling a color from the veining for the island can tie the whole palette together.
- Match the island to the lowers for a seamless, grounded look.
- Use a deeper version of the lower color for a gentle accent.
- Introduce stained wood on the island to break up a room full of painted finishes.
- Let the island hardware finish echo your faucet or lighting for cohesion.
- If your island has paneling or legs, make sure the detail reads well in the darker color. Redleaf Renovations can adjust profiles so they pop under stain or paint.
Tall Cabinets, Pantries, and Appliance Panels
Tall cabinets change the rules because they break the natural countertop split. Decide whether tall units belong to the upper group or to the lower group. Most of the time, carrying the lower color up on tall pantry cabinets looks balanced. It anchors the wall and keeps the palette from getting choppy. If you have a wall of floor-to-ceiling storage, consider adding a light center section with glass doors to soften the mass.
For panel-ready appliances, match the fridge panel to the tall pantry color beside it. If that area is near a window or door, test samples in full daylight. Dark colors can go cooler in strong light. Our team at Redleaf Renovations tests sheen and undertone for you under both daylight and warm LEDs so the panels blend with the cabinetry in all conditions.
Backsplash, Countertops, and Flooring: Tying the Palette Together
Your surfaces bridge the two cabinet colors. A balanced design usually uses a countertop that relates to both. For example, a white quartz with a soft gray or taupe vein connects ivory uppers to greige lowers. If you choose a bold stone on the island, keep the perimeter countertop quieter so the eye has a place to rest. Backsplash color greatly impacts the upper cabinets. A light, low-contrast backsplash will stretch the upper area and keep it airy. A strong tile pattern can compete with your two tone. Use it in moderation or on a single wall.
- Echo the lower cabinet color in small amounts in the backsplash or grout to tie it in.
- Select a floor with a medium tone so the darker lowers do not feel too heavy against it.
- If your floors are very dark, choose a lower cabinet color a shade or two lighter to avoid a black wall effect.
- A stone with a warm vein can connect warm wood island tones to cool painted uppers.
- Matte tiles reduce glare and let the two tone cabinets be the star.
Lighting Rules That Make Two Tone Successful
Light reveals color. Without a good lighting plan, even the best palette will fall flat. Place undercabinet lighting to erase shadows on the backsplash and to lift light uppers. Use warm 2700K to 3000K LEDs to keep whites soft and woods rich. Pair bright task lighting with dimmable pendants for evening mood. If your kitchen faces north in Wauwatosa winters, expect cooler daylight. Test your samples during the brightest part of the day and again at night under your fixtures. Redleaf Renovations creates sample boards finished with the same coatings we install so you can preview the true look.
- Use undercabinet lighting to connect the upper and lower colors with an even wash.
- Keep pendant finishes consistent with your hardware tones.
- Avoid glossy paint on dark lowers. It shows every kick and smudge under strong light.
- Consider a light interior for glass uppers so contents do not look shadowy.
Color Pairings That Rarely Fail
- Warm white uppers with navy or midnight blue lowers. Classic contrast with coastal calm.
- Soft ivory uppers with charcoal lowers. Elegant and modern without harsh edges.
- Cream uppers with natural white oak lowers. Light on light with layered texture.
- Crisp white uppers with black lowers. Bold but balanced when floors are medium tone.
- Pale greige uppers with deep forest green lowers. Rich and organic for nature lovers.
- Alabaster uppers with smoky blue lowers. Fresh and friendly for family kitchens.
- Linen uppers with espresso-stained oak island. Adds warmth to an all-painted perimeter.
- White uppers with taupe or mushroom lowers. Timeless and resale friendly in Wauwatosa homes from the 1920s to today.
Style Guides: Modern, Transitional, Farmhouse, and Traditional
Modern
Use flat-panel doors with a matte finish. Keep uppers light and minimal. Choose a darker island or lower run for contrast. Streamlined hardware and flush toe kicks keep the look clean. Consider a subtle wood grain on the island to soften the edges without losing the modern vibe.
Transitional
Shaker doors are the sweet spot. Light uppers, slightly darker lowers, and a wood island is a winning trio. Use veined quartz that connects both tones. Add classic pulls in a warm satin brass or brushed nickel to bridge traditional and contemporary details.
Farmhouse and Cottage
Mix painted uppers in a creamy white with stained or painted lowers in a gentle green or blue. Add open shelves in wood that match your island. Use beadboard in the back of glass uppers for texture. Keep finishes soft and inviting.
Traditional and Craftsman
Respect the wood. Stained lowers in quartersawn oak with light painted uppers can honor period details and keep the room bright. Use furniture-style base details and substantial crown. Redleaf Renovations often sources Amish-built cabinetry for these homes to achieve authentic grain and joinery.
Common Mistakes and How to Avoid Regret
- Introducing a third cabinet color without a plan. Limit to two cabinet colors plus one natural wood if needed.
- Ignoring floor tone. Dark floors with dark lowers can feel bottom heavy. Balance with a medium-tone floor or lighter lower color.
- Letting the range hood fight the uppers. Align its color with the uppers or design it as a feature that continues the lower tone.
- Forgetting sheen. Use satin or matte on dark lowers to hide wear. Semi-gloss can be too reflective.
- Skipping large samples. Paint chips are not enough. Ask for door-size samples under your actual lighting.
- Mismatched hardware tone. Choose one finish family for pulls, faucet, and lighting for a unified look.
- Clashing island bar stools with the island color. Test the stool finish against the island sample before ordering.
- Random split points. Always use natural breaks like countertops and full cabinet runs to change colors.
- Choosing trendy colors without checking undertones. Test against your backsplash, counters, and floors.
- Not planning sight lines. In open-concept spaces, view the kitchen from the living room and entry to confirm the focal color is in the right place.
How Redleaf Renovations Makes Two Tone Easy
Since 2011, Redleaf Renovations has delivered personalized remodeling with craftsmanship you can trust. Our process begins with listening. We learn how you cook, gather, and move through your space. Then we translate that into a two tone cabinet plan that fits your life and your architecture. We source Amish-built cabinets with stable hardwood frames, premium veneers, and durable joinery. Our finishes use professional-grade coatings for rich color and long wear. Doors arrive pre-finished for consistency, and we fine-tune fit on site.
We map the dark and light split on your exact floor plan. We account for tall units, window placements, and hood dimensions so the color changes happen at natural breaks. You see the design through 3D renderings before we order materials. We provide oversized color samples and finish blocks, test them under your real lighting, and confirm hardware and sheen choices. From installation to final touch-ups, Redleaf Renovations keeps a tight eye on detail so your two tone kitchen cabinets look intentional from every angle.
Real World Layouts: Where the Split Should Happen
- Galley kitchen: Keep uppers light on both sides to prevent a tunnel effect. Use darker lowers on both runs to ground the space. If one side has a window, keep the cabinet color consistent across the entire run so the window wall does not feel disjointed.
- L-shape with peninsula: Carry light uppers along both legs. Use darker lowers on the perimeter and match the peninsula base to the lowers. If you add glass uppers near the corner, keep their interior light so the turn stays open.
- U-shaped kitchen: Use light uppers on all three walls. Consider choosing the deepest wall for a darker feature around the hood, then return to light on the short walls to avoid overload. Match tall pantry units to the lower color for a solid anchor at one end.
- Large island: Make the island your accent. If perimeter lowers are medium gray, choose a deeper charcoal or a stained wood on the island. Keep uppers light to balance the mass of the island.
- Small kitchen: Stick to the classic formula. Light uppers, slightly darker lowers, and a modest contrast on the hardware. Avoid busy backsplash patterns that compete with the two tone palette.
- Open concept: Decide what you want to see from the living room. Often the island becomes the focal color while the perimeter stays quiet. Make sure the island color ties to a nearby element like the fireplace mantle or dining chairs.
- Low ceilings: Keep all uppers and crown light. Use a mid-tone lower color to avoid stark contrast lines that make the ceiling feel lower.
- Tall ceilings: You can handle stronger contrast. Consider a deeper lower color and taller light uppers with a proportionate crown. Dark uppers are possible in moderation on a single feature wall.
- Window wall: Treat the entire run around the window as one unit. If you want a darker moment, bring that color from base to the bottom of the window and across the uppers flanking the hood or window for continuity.
- With soffits: If soffits are present, paint them to match the uppers so the whole top zone reads as one light plane. Keep your darker tone below the counter for a clear split.
Planning Checklist for Two Tone Kitchen Cabinets
- Define your style and how you use the kitchen daily.
- Assess light: direction, size of windows, and fixture plan.
- Choose your hero material first: countertop or floor.
- Set the split line at the countertop and confirm how to handle tall units.
- Select cabinet colors with undertones that match your hero material.
- Decide the island strategy: match lowers, go darker, or choose wood.
- Pick hardware and lighting finishes to tie the palette together.
- Test large samples under day and night lighting.
- Confirm sheen: matte or satin for dark lowers, satin or semi for light uppers.
- Review 3D renderings with Redleaf Renovations to finalize the layout and color breaks.
Get Started With Redleaf Renovations
Two tone kitchen cabinets look effortless when every choice supports the next. With Redleaf Renovations, you get a partner who understands how color, craftsmanship, and layout work together. We guide you to the smartest dark and light split for your uppers, lowers, and island, then build Amish-crafted cabinetry that shows off your palette. If you live in or around Wauwatosa, Wisconsin, we would be proud to help you design and remodel a kitchen that feels made just for you. Share your inspiration, and we will turn it into a plan that avoids regrets and stands the test of time.
Ready to see how your two tone kitchen cabinets could look in your home? Contact Redleaf Renovations for a consultation and a custom design preview. We will make the process clear, the finish beautiful, and the results something you love living with every day.